Cookie Dough Vegan Ice Cream Sandwiches (Easy + No-Bake!)
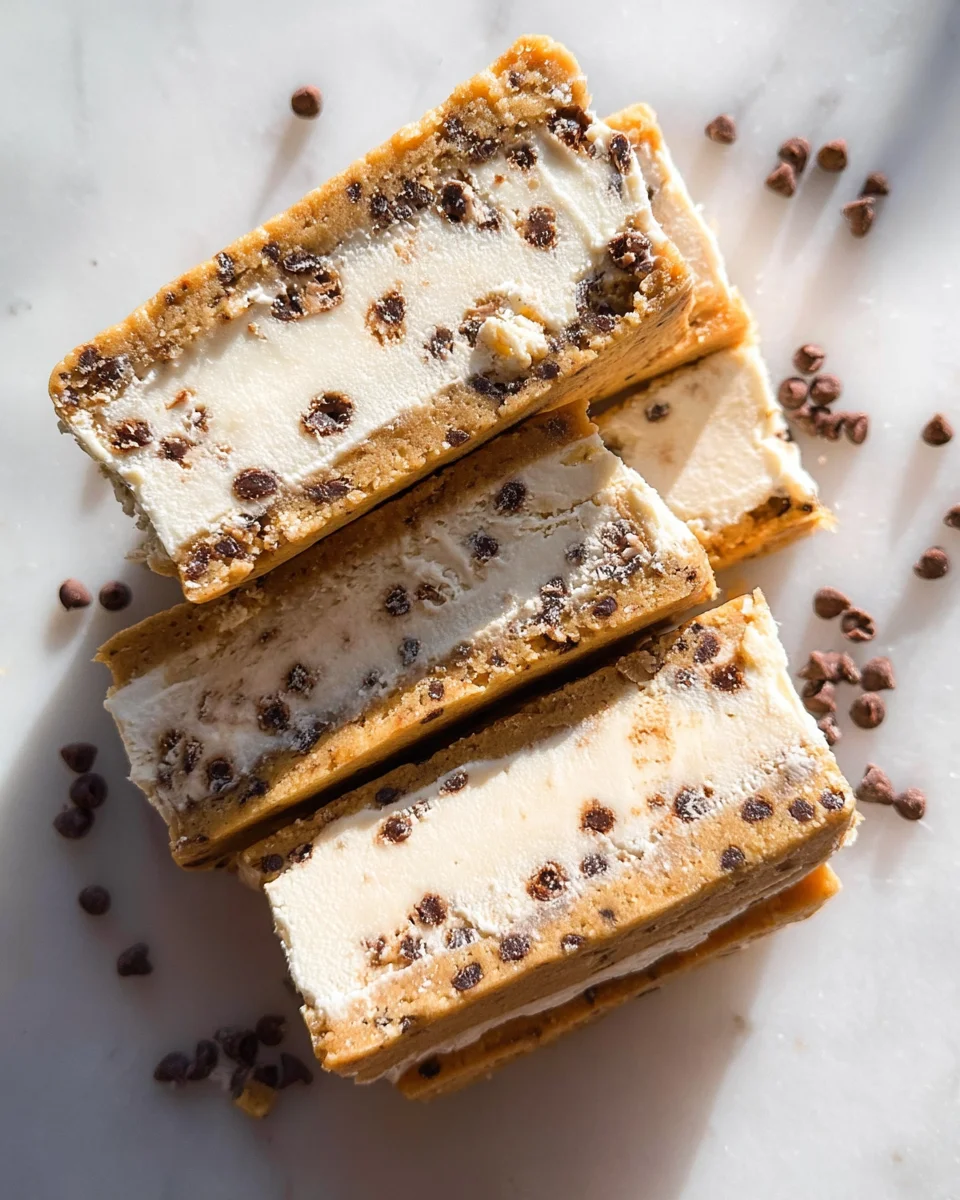
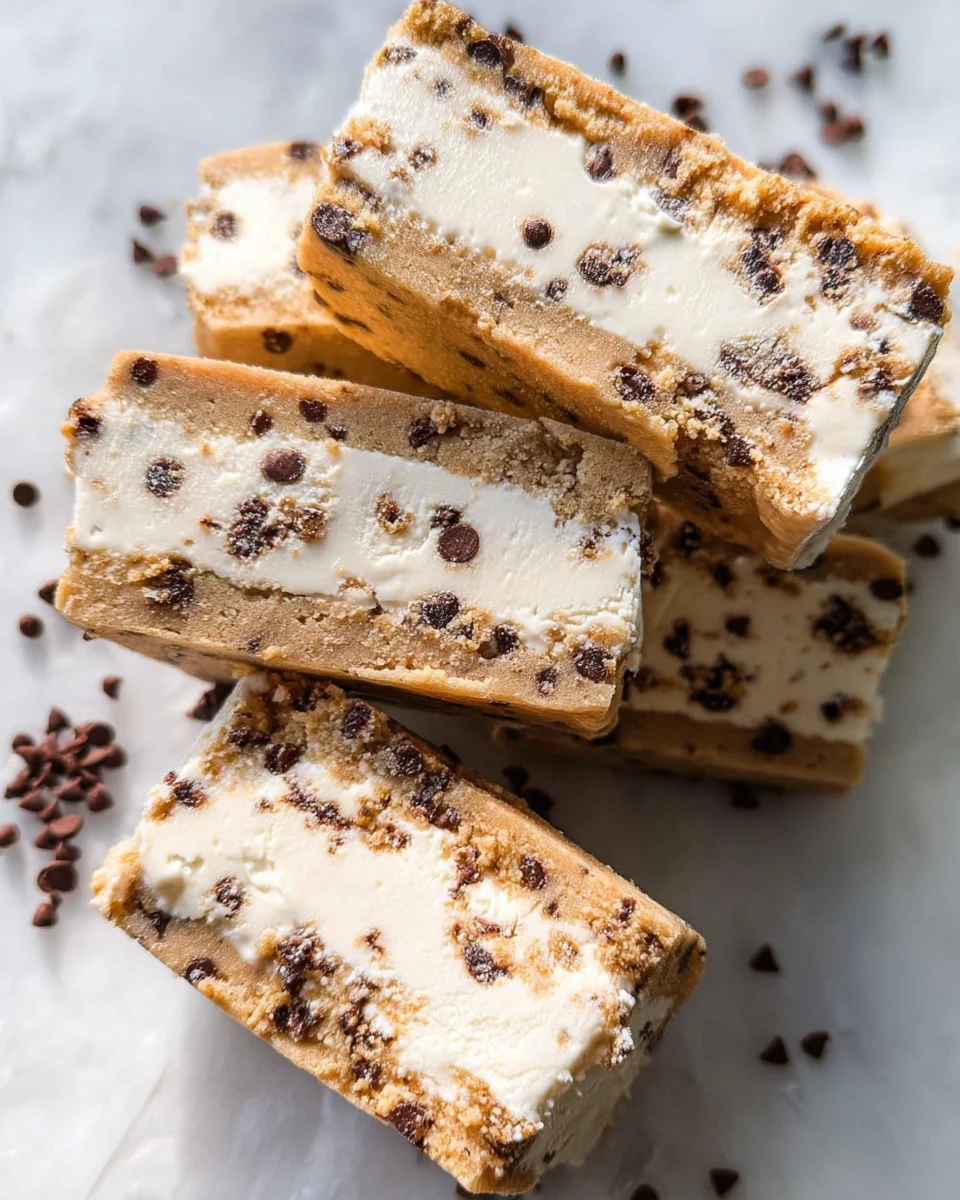
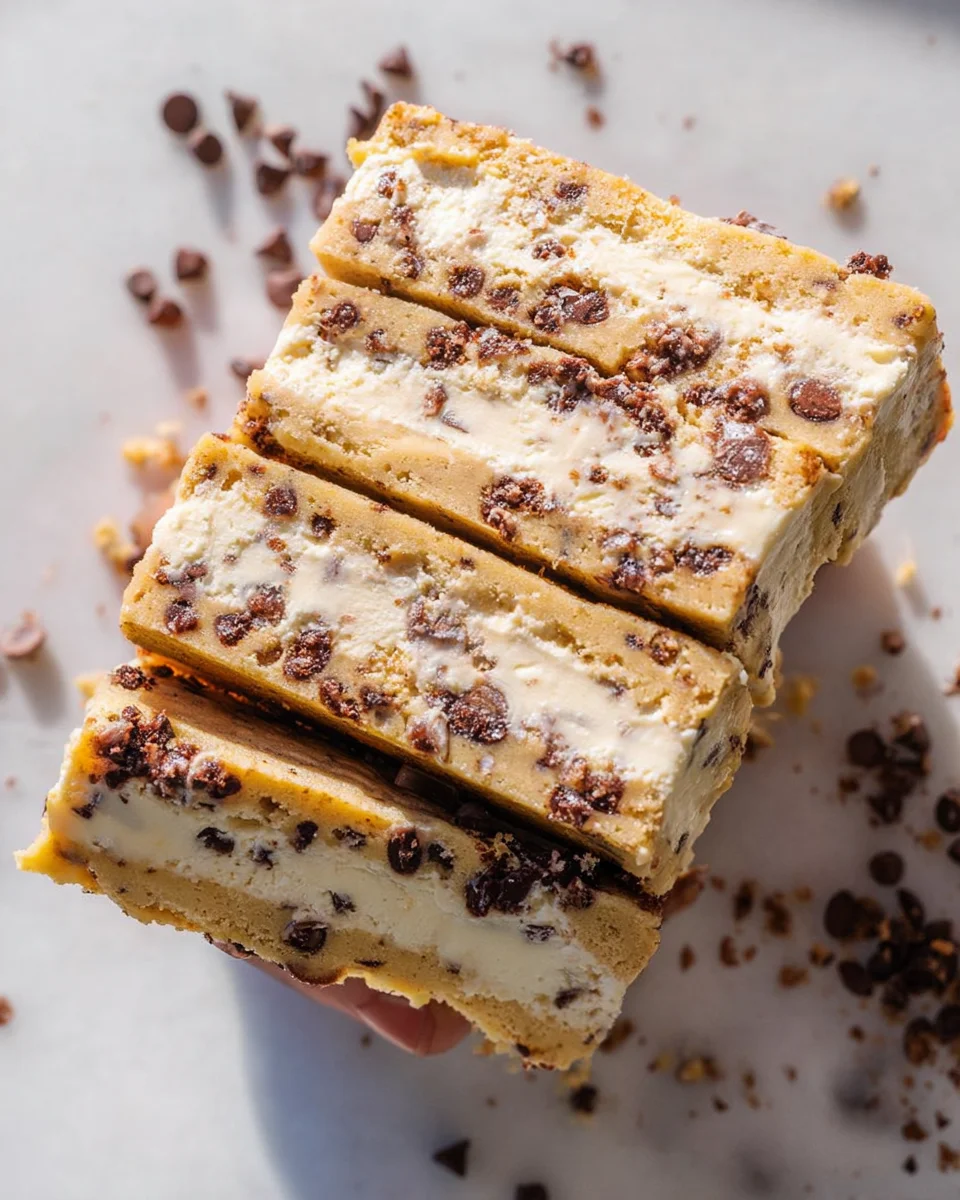
These Cookie Dough Vegan Ice Cream Sandwiches (Easy + No-Bake!) are the perfect summertime treat that everyone will love! With creamy non-dairy ice cream nestled between soft and chewy cookie dough layers, these sandwiches provide a delightful balance of flavors and textures. Made with wholesome ingredients, they are gluten-free, nut-free, and naturally sweetened with maple syrup. Whether you’re hosting a summer gathering or simply looking for a refreshing dessert at home, these no-bake treats will impress family and friends alike!
Why You’ll Love This Recipe
- No-Bake Convenience: Enjoy a delicious dessert without turning on the oven. Perfect for hot days!
- Wholesome Ingredients: Made from simple, healthy ingredients, making them suitable for various dietary needs.
- Customizable Flavors: Feel free to switch up the ice cream flavor or add different mix-ins to suit your taste.
- Kid-Friendly Fun: Involve the little ones in making these sandwiches; they’ll love assembling their own!
- Meal Prep Friendly: Make a batch ahead of time and store them in the freezer for easy access to treats.
Tools and Preparation
Before you start making your Cookie Dough Vegan Ice Cream Sandwiches, gather the necessary tools. This will help streamline your process and ensure everything goes smoothly.
Essential Tools and Equipment
- Baking sheet
- Parchment paper
- Mixing bowl or stand mixer
- Measuring cups and spoons
- Cutting board
Importance of Each Tool
- Baking sheet: Provides a sturdy surface for freezing the cookie dough and assembling the sandwiches.
- Parchment paper: Prevents sticking and makes it easy to lift out the cookie dough.
- Mixing bowl or stand mixer: Essential for easily mixing ingredients together until smooth.
- Measuring cups and spoons: Accurate measurements are key to achieving the right texture in your cookie dough.
Ingredients
For these Cookie Dough Vegan Ice Cream Sandwiches, you will need:
1 flax egg (1 tablespoon ground flax + 2 tablespoons water; stir and let thicken 3–5 minutes)
½ cup vegan butter, melted (or grass-fed butter)
½ cup + 2 tablespoons pure maple syrup (or honey)
2 teaspoons vanilla extract
1¾ cups gluten-free flour (must contain xanthan gum; see note on heat-treating)
⅛ teaspoon pink Himalayan salt
½ cup mini dairy-free chocolate chips
2½ cups (20 fl. oz) vanilla non-dairy ice cream (or any ice cream of choice)
How to Make Cookie Dough Vegan Ice Cream Sandwiches (Easy + No-Bake!)
Step 1: Prepare Your Baking Sheet
Line a rimmed baking sheet with parchment paper and make space in your freezer.
Step 2: Make the Cookie Dough
In a medium bowl or stand mixer:
1. Mix the thickened flax egg, melted vegan butter, maple syrup, and vanilla until smooth.
2. Add the heat-treated gluten-free flour and pink salt.
3. Mix for about 2 minutes until a soft dough forms.
Step 3: Shape the Cookie Dough
- Fold in the chocolate chips.
- Transfer the dough to the prepared baking sheet.
- Place another piece of parchment on top and flatten the dough with your hands into a 15×12 inch rectangle about ¼ inch thick.
- Keep the top parchment on and freeze for at least 40 minutes, until firm.
Step 4: Assemble Your Sandwiches
- Once firm, transfer the dough to a cutting board.
- Slice vertically down the center to create two equal rectangles.
- If your ice cream is firm, let it soften at room temperature for about 10 minutes.
- Spread softened ice cream evenly over one half of cookie dough.
- Carefully place the other half on top.
Step 5: Final Freeze
Transfer the sandwich back to the baking sheet:
1. Freeze for 4 hours or overnight until set.
2. Slice into desired shapes (about 18 medium-sized sandwiches) and serve.
Store leftovers in an airtight container in the freezer for up to 5 months.
Now you’re ready to enjoy your delicious Cookie Dough Vegan Ice Cream Sandwiches! These treats are not just tasty but also easy to make, fitting perfectly into any dessert occasion!
How to Serve Cookie Dough Vegan Ice Cream Sandwiches (Easy + No-Bake!)
These delicious Cookie Dough Vegan Ice Cream Sandwiches are perfect for any occasion. Whether you’re hosting a summer party or enjoying a quiet night in, here are some serving suggestions to elevate your treat.
Classic Presentation
- Use a decorative plate to serve your sandwiches for an inviting look.
- Arrange them in a stack with some mini chocolate chips sprinkled around for added flair.
Drizzle and Dazzle
- Drizzle melted dairy-free chocolate over the top for a decadent touch.
- Add a sprinkle of sea salt on top of the chocolate drizzle for a sweet and salty contrast.
Fresh Fruit Pairing
- Serve alongside fresh berries like strawberries or raspberries for a refreshing balance.
- Slice bananas and place them next to the sandwiches for an extra fruity flavor.
Ice Cream Scoop
- Accompany each sandwich with a scoop of vanilla non-dairy ice cream on the side.
- This adds an extra creamy element that is sure to please everyone.
Fun with Toppings
- Provide toppings like crushed nuts, coconut flakes, or sprinkles for guests to customize their sandwiches.
- Set up a DIY topping station for an interactive dessert experience.
Chilled Beverage Companion
- Pair with iced coffee or a cold glass of almond milk for a refreshing drink option.
- A fruit-infused sparkling water can also be a delightful complement.
How to Perfect Cookie Dough Vegan Ice Cream Sandwiches (Easy + No-Bake!)
To achieve the best results with your Cookie Dough Vegan Ice Cream Sandwiches, follow these helpful tips.
- Use High-Quality Ingredients: Opt for pure maple syrup and high-quality vegan butter to enhance flavor.
- Mind the Freezing Time: Allow enough time for freezing; this ensures the sandwiches hold their shape when served.
- Avoid Overmixing: When combining ingredients, mix just until combined to maintain a tender cookie texture.
- Customize Flavors: Experiment with different extracts or add-ins like almond extract or dried fruits for unique flavors.
- Keep Portions Consistent: Use a ruler or template to cut uniform rectangles of cookie dough for even sandwiches.
- Serve Fresh: While they store well, these sandwiches are best enjoyed fresh after freezing.
Best Side Dishes for Cookie Dough Vegan Ice Cream Sandwiches (Easy + No-Bake!)
Pairing side dishes with your Cookie Dough Vegan Ice Cream Sandwiches can enhance the overall dessert experience. Here are some tasty options:
- Fresh Fruit Salad: A mix of seasonal fruits adds freshness and balances sweetness.
- Vegan Whipped Coconut Cream: Light and fluffy, this creamy topping complements the sandwiches beautifully.
- Chocolate-Dipped Strawberries: These indulgent treats add elegance and flavor alongside your sandwiches.
- Nutty Granola Bars: Homemade bars provide a crunchy contrast and can be made in advance.
- Chilled Lemonade: Refreshing lemonade offers a zesty drink option that pairs well with sweet desserts.
- Coffee or Tea: A warm beverage provides comfort and balances out the sweetness of the ice cream sandwiches.
Common Mistakes to Avoid
Making Cookie Dough Vegan Ice Cream Sandwiches (Easy + No-Bake!) can be simple, but avoiding common mistakes is crucial for the best results. Here are some pitfalls to steer clear of:
- Using unheated flour: Raw flour can contain harmful bacteria. Always heat-treat your flour before use to ensure safety.
- Not letting the ice cream soften: If the ice cream is too hard, it will be difficult to spread. Allow it to sit at room temperature for about 10 minutes before using.
- Skipping the parchment paper: Not lining your baking sheet with parchment can lead to sticking and a messy cleanup. Always use parchment for easy removal.
- Cutting too soon: If you slice the sandwiches before they are fully frozen, they may fall apart. Freeze them for at least 4 hours or overnight for the best texture.
- Ignoring portion sizes: Making sandwiches too large can lead to an overwhelming treat. Aim for medium-sized portions for a balanced dessert experience.
Storage & Reheating Instructions
Refrigerator Storage
- Store leftover cookie dough vegan ice cream sandwiches in an airtight container.
- They will last about 3-5 days in the fridge.
Freezing Cookie Dough Vegan Ice Cream Sandwiches (Easy + No-Bake!)
- Keep sandwiches wrapped tightly in plastic wrap or in a freezer-safe container.
- They stay fresh for up to 5 months in the freezer.
Reheating Cookie Dough Vegan Ice Cream Sandwiches (Easy + No-Bake!)
- Oven: Preheat to 350°F and warm for about 5 minutes; great for a slightly melted treat.
- Microwave: Heat on low power for 10-15 seconds; be careful not to overheat.
- Stovetop: Use a skillet on low heat, flipping once; watch closely to avoid burning.
Frequently Asked Questions
If you’re curious about making Cookie Dough Vegan Ice Cream Sandwiches (Easy + No-Bake!), here are some common questions answered:
Can I use regular flour instead of gluten-free?
You can use regular all-purpose flour, but remember that you need to heat-treat it first. This ensures it’s safe to eat raw.
How do I customize my ice cream flavor?
Feel free to swap out vanilla ice cream for any non-dairy flavor you love! Chocolate, mint, or even fruit-flavored varieties work well.
How long does it take to make these sandwiches?
The total time is about 4 hours and 20 minutes, which includes chilling time. Most of that is hands-off while they freeze!
Are these cookie dough vegan ice cream sandwiches healthy?
Yes! They are made with wholesome ingredients and are gluten-free and nut-free, making them a guilt-free indulgence.
Final Thoughts
These Cookie Dough Vegan Ice Cream Sandwiches (Easy + No-Bake!) are not just delicious but also versatile! You can easily customize them with different flavors and mix-ins. Perfect as a cooling summer treat or a sweet snack anytime—give this recipe a try and enjoy a delightful twist on classic desserts!
Cookie Dough Vegan Ice Cream Sandwiches (Easy + No-Bake!)
- Total Time: 0 hours
- Yield: Makes approximately 9 sandwiches 1x
Description
Indulge in the ultimate summer treat with these Cookie Dough Vegan Ice Cream Sandwiches (Easy + No-Bake!). Perfectly crafted for hot days, these sandwiches feature creamy non-dairy ice cream nestled between soft, chewy layers of cookie dough. Made with wholesome ingredients, they are gluten-free, nut-free, and naturally sweetened with maple syrup. Whether you’re hosting a gathering or treating yourself at home, these simple no-bake delights are sure to impress everyone!
Ingredients
- 1 flax egg (1 tbsp ground flax + 2 tbsp water)
- ½ cup vegan butter (melted)
- ½ cup + 2 tbsp pure maple syrup
- 2 tsp vanilla extract
- 1¾ cups gluten-free flour
- ⅛ tsp pink Himalayan salt
- ½ cup mini dairy-free chocolate chips
- 2½ cups vanilla non-dairy ice cream
Instructions
- Prepare a rimmed baking sheet lined with parchment paper.
- In a mixing bowl, combine the flax egg, melted vegan butter, maple syrup, and vanilla until smooth.
- Add gluten-free flour and salt; mix until a soft dough forms. Fold in chocolate chips.
- Flatten the dough into a rectangle on the prepared baking sheet and freeze for at least 40 minutes.
- Once firm, slice the dough in half; spread softened non-dairy ice cream on one half and top with the other half.
- Freeze for an additional 4 hours or overnight before slicing into individual sandwiches.
- Prep Time: 20 minutes
- Cook Time: Freezing time included
- Category: Dessert
- Method: No-Bake
- Cuisine: Vegan
Nutrition
- Serving Size: 1 sandwich
- Calories: 230
- Sugar: 12g
- Sodium: 140mg
- Fat: 9g
- Saturated Fat: 3g
- Unsaturated Fat: 6g
- Trans Fat: 0g
- Carbohydrates: 37g
- Fiber: 3g
- Protein: 3g
- Cholesterol: 0mg

